
· 3 min read
Kaustubh Kulkarni

ServiceNow Glide APIs provide developers with a set of RESTful APIs to interact with ServiceNow and build custom applications. The Glide APIs support a range of functions for creating, updating, and querying data in ServiceNow. In this section, we'll explore the different Glide APIs available in ServiceNow and provide examples of how they can be used.

  1. GlideRecord API:

The GlideRecord API is one of the most widely used APIs in ServiceNow. It provides developers with a way to interact with tables and records in ServiceNow. With the GlideRecord API, developers can query and manipulate data in ServiceNow tables. Here's an example of how to use the GlideRecord API to query data:

// Query data from the Incident table
var gr = new GlideRecord('incident');
gr.addQuery('priority', 1);
gr.query();
while (gr.next()) {
gs.log(gr.number);
}

In this example, we're querying the incident table for all records with a priority of 1. We then loop through the results and log the incident number.

  1. GlideAggregate API:

The GlideAggregate API provides developers with a way to perform aggregate functions on data in ServiceNow tables. With the GlideAggregate API, developers can perform functions like sum, count, min, and max on data in ServiceNow tables. Here's an example of how to use the GlideAggregate API to perform a count on data:

// Count the number of incidents by category
var ga = new GlideAggregate('incident');
ga.addAggregate('COUNT', 'category');
ga.groupBy('category');
ga.query();
while (ga.next()) {
gs.log(ga.category + ': ' + ga.getAggregate('COUNT', 'category'));
}

In this example, we're using the GlideAggregate API to count the number of incidents by category. We group the results by category and then loop through the results and log the category and count.

  1. GlideSystem API:

The GlideSystem API provides developers with a way to interact with system-level functions in ServiceNow. With the GlideSystem API, developers can access system properties, log messages, and perform other system-level functions. Here's an example of how to use the GlideSystem API to log a message:

// Log a message to the system log
gs.log('Hello World');

In this example, we're using the GlideSystem API to log a message to the system log. This is a useful function for debugging and troubleshooting.

  1. GlideForm API:

The GlideForm API provides developers with a way to interact with forms in ServiceNow. With the GlideForm API, developers can access form fields, submit forms, and perform other form-level functions. Here's an example of how to use the GlideForm API to access a form field:

// Get the value of the Short Description field on the current form
var shortDesc = g_form.getValue('short_description');
gs.log(shortDesc);`

In this example, we're using the GlideForm API to get the value of the Short Description field on the current form. We then log the value to the system log.

  1. GlideAjax API:

The GlideAjax API provides developers with a way to make asynchronous server calls in ServiceNow. With the GlideAjax API, developers can make server calls without refreshing the page. Here's an example of how to use the GlideAjax API to make a server call:

// Make an asynchronous server call to get the current user's name
var ga = new GlideAjax('GetUserName');
ga.addParam('sysparm_name', 'getCurrentUserName');
ga.getXML(function(response) {
var name = response.responseXML.documentElement.getAttribute('answer');
gs.log(name);
});

· 4 min read
Kaustubh Kulkarni

ServiceNow is a cloud-based platform that provides a comprehensive suite of tools for managing business processes, IT services, and other workflows. One of the key features of ServiceNow is its Glide APIs, which provide a powerful set of tools for developers to integrate with the platform and build custom applications.

In this documentation, we'll take a closer look at the Glide APIs and explore the key features and capabilities of this powerful toolset.

What are Glide APIs?

The Glide APIs are a set of RESTful APIs that enable developers to interact with the ServiceNow platform and build custom applications. These APIs are built on top of the ServiceNow platform and provide a range of functions for creating, updating, and querying data in ServiceNow.

The Glide APIs can be used to build custom applications that integrate with ServiceNow, as well as to automate business processes and workflows. Some of the key capabilities of the Glide APIs include:

  • Creating, updating, and querying records in ServiceNow
  • Managing user and group permissions
  • Performing advanced searches and queries
  • Managing attachments and files
  • Managing notifications and alerts
  • Integrating with third-party systems

Key Features of Glide APIs:

The Glide APIs offer a range of features and capabilities that make them a powerful toolset for building custom applications on the ServiceNow platform. Here are some of the key features of the Glide APIs:

  1. RESTful API: The Glide APIs are built on RESTful principles, which means they are easy to use and integrate with other systems. They support a range of HTTP methods, including GET, POST, PUT, and DELETE, which makes it easy to perform CRUD (create, read, update, delete) operations on ServiceNow data.

  2. Security: The Glide APIs provide robust security features, including authentication and access control, to ensure that only authorized users can access ServiceNow data. This helps to protect sensitive data and prevent unauthorized access.

  3. Customization: The Glide APIs can be customized to meet the specific needs of an organization. This includes the ability to create custom API endpoints, integrate with third-party systems, and more.

  4. Performance: The Glide APIs are designed to be fast and efficient, with low latency and high throughput. This ensures that applications built on the Glide APIs are responsive and performant.

  5. Integration: The Glide APIs can be integrated with a range of third-party systems, including ERP, CRM, and HR systems. This enables organizations to streamline their operations and improve efficiency.

Benefits of Glide APIs:

The Glide APIs offer a range of benefits to developers and organizations that are looking to build custom applications on the ServiceNow platform. Here are some of the key benefits of the Glide APIs:

  1. Customization: The Glide APIs enable developers to build custom applications that are tailored to the specific needs of an organization. This helps to improve user adoption and make the platform more effective.

  2. Integration: The Glide APIs can be integrated with a range of third-party systems, which enables organizations to streamline their operations and improve efficiency.

  3. Security: The Glide APIs provide robust security features, including authentication and access control, to protect sensitive data and prevent unauthorized access.

  4. Performance: The Glide APIs are designed to be fast and efficient, with low latency and high throughput. This ensures that applications built on the Glide APIs are responsive and performant.

  5. Scalability: The Glide APIs are built on a scalable platform, which means they can handle large volumes of data and users. This makes them a flexible solution that can grow with the business.

The Glide APIs are a powerful toolset for building custom applications on the ServiceNow platform. With a range of features and benefits, the Glide APIs enable developers to create custom workflows and integrations that streamline operations and improve efficiency. Whether you're looking to build a custom application

· 4 min read
Kaustubh Kulkarni

ServiceNow is a cloud-based platform that enables organizations to automate their business processes and streamline operations. It provides a comprehensive suite of tools that can be used to manage IT services, HR workflows, customer service, and more. With ServiceNow, businesses can improve efficiency, reduce costs, and enhance their overall productivity. In this article, we'll take a closer look at ServiceNow development and explore the key features and benefits of this platform.

What is ServiceNow Development?

ServiceNow development is the process of building and customizing applications on the ServiceNow platform. This involves using a variety of development tools and techniques to create workflows, forms, and other user interfaces that are tailored to the needs of an organization. ServiceNow developers use a combination of scripting languages, such as JavaScript, AngularJS, and HTML/CSS, to create custom applications and integrations with other systems.

ServiceNow development can be used to automate a variety of business processes, including IT service management (ITSM), HR workflows, customer service, and more. Developers can build custom workflows, forms, and other user interfaces that integrate with existing systems and enable organizations to streamline their operations.

Key Features of ServiceNow Development:

ServiceNow development offers a range of features and capabilities that make it a powerful platform for building and customizing business applications. Here are some of the key features of ServiceNow development:

  1. Workflow Automation: ServiceNow enables developers to build custom workflows that automate business processes and improve efficiency. Workflows can be created using a drag-and-drop interface, which makes it easy to design and customize complex processes.

  2. Service Catalog: ServiceNow includes a service catalog that enables organizations to create a self-service portal for employees and customers. This catalog can be customized to include a range of services, including IT support, HR requests, and more.

  3. Reporting and Analytics: ServiceNow provides a range of reporting and analytics tools that enable organizations to track performance, identify trends, and make data-driven decisions.

  4. Customization: ServiceNow offers a range of customization options that enable developers to tailor the platform to the specific needs of an organization. This includes the ability to create custom workflows, forms, and user interfaces.

  5. Integration: ServiceNow can be integrated with a range of third-party systems, including ERP, CRM, and HR systems. This enables organizations to streamline their operations and improve efficiency.

Benefits of ServiceNow Development:

ServiceNow development offers a range of benefits to organizations that are looking to automate their business processes and streamline operations. Here are some of the key benefits of ServiceNow development:

  1. Improved Efficiency: ServiceNow enables organizations to automate their business processes, which can help to improve efficiency and reduce costs. By automating manual processes, organizations can free up resources and focus on more strategic initiatives.

  2. Better Collaboration: ServiceNow provides a centralized platform that enables teams to collaborate more effectively. This can help to improve communication, reduce errors, and enhance productivity.

  3. Increased Transparency: ServiceNow provides real-time visibility into business processes, which can help organizations to identify bottlenecks, track performance, and make data-driven decisions.

  4. Customization: ServiceNow offers a range of customization options that enable organizations to tailor the platform to their specific needs. This can help to improve user adoption and make the platform more effective.

  5. Scalability: ServiceNow is a cloud-based platform that can be scaled up or down based on the needs of an organization. This makes it a flexible solution that can grow with the business.

ServiceNow development is a powerful platform that enables organizations to automate their business processes, streamline operations, and improve efficiency. With a range of features and benefits, ServiceNow development can help organizations to achieve their goals and stay competitive in today's fast-paced business environment. Whether you're looking to streamline

· 5 min read
Kaustubh Kulkarni

ServiceNow is a cloud-based platform that offers various tools and modules for IT service management, IT operations management, IT business management, and more. As the platform continues to gain popularity and adoption, there are various career options available in ServiceNow. Some of them are:

  1. ServiceNow Developer: ServiceNow Developers are responsible for developing and customizing applications, workflows, and integrations on the ServiceNow platform. They need to have a deep understanding of the platform and its capabilities.

  2. ServiceNow Administrator: ServiceNow Administrators are responsible for managing and configuring the ServiceNow instance. They need to have knowledge of ServiceNow modules, workflows, and integrations.

  3. ServiceNow Consultant: ServiceNow Consultants provide consulting services to clients who use the ServiceNow platform. They help clients with implementation, customization, and integration of the platform.

  4. ServiceNow Project Manager: ServiceNow Project Managers oversee ServiceNow implementation projects. They are responsible for planning, coordinating, and managing the project team.

  5. ServiceNow Architect: ServiceNow Architects design and develop solutions using the ServiceNow platform. They need to have a deep understanding of the platform and its capabilities and should have experience in designing solutions.

  6. ServiceNow Business Analyst: ServiceNow Business Analysts analyze business requirements and translate them into technical requirements for ServiceNow developers. They need to have knowledge of both business processes and the ServiceNow platform.

  7. ServiceNow Technical Consultant: ServiceNow Technical Consultants provide technical expertise to clients who use the ServiceNow platform. They help clients with implementation, customization, and integration of the platform.

  8. ServiceNow Trainer: ServiceNow Trainers provide training to users of the ServiceNow platform. They need to have in-depth knowledge of the platform and its capabilities.

These are some of the career options available in ServiceNow. However, it is important to note that these roles may require specific skills and certifications.What is Incident Management?

Incident Management is the process of managing and resolving incidents that impact an organization's IT infrastructure. IT incidents can be anything from a simple hardware failure to a major security breach. The goal of Incident Management is to restore normal IT service operations as quickly as possible with minimal impact on the business.

ServiceNow Incident Management

The ServiceNow Incident Management module is designed to help IT organizations manage and resolve incidents in a timely and efficient manner. The module provides a centralized repository for managing incidents, tracking their status, and resolving them. Some of the key features of the ServiceNow Incident Management module include:

  1. Incident Creation: The module allows users to create incidents manually or automatically through integration with other systems. Incidents can be created by end-users through the Self-Service portal or by IT staff through the ServiceNow platform.

  2. Incident Categorization and Prioritization: The module provides a standard set of incident categories and priorities that can be customized to meet the needs of the organization. The categorization and prioritization of incidents are based on the impact and urgency of the incident.

  3. Incident Assignment: Incidents can be assigned to IT staff based on their skills, availability, and workload. The module allows for the creation of assignment rules to automate the assignment process.

  4. Incident Escalation: The module provides a mechanism for escalating incidents to higher-level support groups if they are not resolved within a certain timeframe. Escalation rules can be customized to meet the needs of the organization.

  5. Incident Resolution: The module allows for the tracking of incident resolution activities and the documentation of the resolution process. The module also allows for the closure of incidents once they are resolved.

  6. Incident Reporting: The module provides a variety of incident reports that can be used to track incident trends, identify problem areas, and measure the effectiveness of the incident management process.

Benefits of ServiceNow Incident Management

The ServiceNow Incident Management module offers several benefits to IT organizations, including:

  1. Faster Incident Resolution: The module provides a centralized repository for managing incidents, which helps to speed up the incident resolution process.

  2. Improved Communication: The module allows for better communication between IT staff and end-users, which helps to keep end-users informed about the status of their incidents.

  3. Better Incident Tracking: The module provides a comprehensive view of all incidents, which helps IT organizations to identify trends and problem areas.

  4. Improved Incident Management Process: The module provides a standardized incident management process that can be customized to meet the needs of the organization.

  5. Reduced Incident Downtime: The module helps IT organizations to resolve incidents faster, which reduces the downtime associated with incidents.

The ServiceNow Incident Management module is an essential tool for IT organizations looking to manage and resolve incidents in a timely and efficient manner. The module provides a centralized repository for managing incidents, tracking their status, and resolving them. The module offers several benefits, including faster incident resolution, improved communication, better incident tracking, improved incident management process, and reduced incident downtime. Overall, the ServiceNow Incident Management module is a valuable tool for IT organizations looking to improve their incident management process.

· 2 min read
Kaustubh Kulkarni

ServiceNow is a cloud-based platform that offers various tools and modules for IT service management, IT operations management, IT business management, and more. As the platform continues to gain popularity and adoption, there are various career options available in ServiceNow. Some of them are:

  1. ServiceNow Developer: ServiceNow Developers are responsible for developing and customizing applications, workflows, and integrations on the ServiceNow platform. They need to have a deep understanding of the platform and its capabilities.

  2. ServiceNow Administrator: ServiceNow Administrators are responsible for managing and configuring the ServiceNow instance. They need to have knowledge of ServiceNow modules, workflows, and integrations.

  3. ServiceNow Consultant: ServiceNow Consultants provide consulting services to clients who use the ServiceNow platform. They help clients with implementation, customization, and integration of the platform.

  4. ServiceNow Project Manager: ServiceNow Project Managers oversee ServiceNow implementation projects. They are responsible for planning, coordinating, and managing the project team.

  5. ServiceNow Architect: ServiceNow Architects design and develop solutions using the ServiceNow platform. They need to have a deep understanding of the platform and its capabilities and should have experience in designing solutions.

  6. ServiceNow Business Analyst: ServiceNow Business Analysts analyze business requirements and translate them into technical requirements for ServiceNow developers. They need to have knowledge of both business processes and the ServiceNow platform.

  7. ServiceNow Technical Consultant: ServiceNow Technical Consultants provide technical expertise to clients who use the ServiceNow platform. They help clients with implementation, customization, and integration of the platform.

  8. ServiceNow Trainer: ServiceNow Trainers provide training to users of the ServiceNow platform. They need to have in-depth knowledge of the platform and its capabilities.

These are some of the career options available in ServiceNow. However, it is important to note that these roles may require specific skills and certifications.

· 3 min read
Kaustubh Kulkarni

ServiceNow is a cloud-based platform that provides a range of modules for IT service management, IT operations management, and IT business management. ServiceNow administration involves managing the various modules, configuring the platform to meet the specific needs of the organization, and ensuring that the platform is secure, stable, and scalable.

In this document, we will provide a detailed overview of ServiceNow administration, covering the following topics:

  • ServiceNow architecture
  • ServiceNow roles and responsibilities
  • ServiceNow instance management
  • ServiceNow user management
  • ServiceNow configuration management
  • ServiceNow security management
  • ServiceNow performance management
  • ServiceNow integration management
  • ServiceNow upgrade management
  • ServiceNow best practices

ServiceNow Architecture

ServiceNow is a cloud-based platform that runs on the Amazon Web Services (AWS) cloud infrastructure. The platform consists of three main components:

  • User Interface: the user interface is the part of the platform that users interact with. It includes web-based interfaces for different modules, such as incident management, service request management, and change management.
  • Database: the database is the part of the platform that stores all the data related to the different modules. ServiceNow uses a relational database management system (RDBMS) to store data.
  • Application Server: the application server is the part of the platform that processes user requests, retrieves data from the database, and generates responses to users.

ServiceNow Roles and Responsibilities

ServiceNow administration involves several roles and responsibilities, including:

  • ServiceNow Administrator: responsible for managing the ServiceNow platform, including configuring modules, managing users, and maintaining the platform's stability and security.
  • ServiceNow Developer: responsible for developing and customizing the platform, including creating new modules, workflows, and integrations.
  • ServiceNow Architect: responsible for designing the platform's architecture, ensuring that it is scalable, secure, and meets the organization's needs.
  • ServiceNow Project Manager: responsible for managing ServiceNow implementation projects, including planning, budgeting, and resource allocation.

ServiceNow Instance Management

ServiceNow instances are separate environments within the ServiceNow platform that can be used for development, testing, and production purposes. ServiceNow administration involves managing instances, including:

  • Creating new instances: ServiceNow administrators can create new instances for development, testing, and production purposes.
  • Managing instances: ServiceNow administrators can manage instances by configuring instance settings, monitoring usage, and performing backups.
  • Upgrading instances: ServiceNow administrators can upgrade instances by installing new releases and patches.

ServiceNow User Management

ServiceNow user management involves managing user accounts, roles, and permissions. ServiceNow administrators can perform the following tasks related to user management:

  • Creating and managing user accounts: ServiceNow administrators can create new user accounts, assign roles, and manage user access.
  • Creating and managing groups: ServiceNow administrators can create new groups and assign roles and permissions to groups.
  • Configuring user roles: ServiceNow administrators can configure user roles and permissions to restrict access to sensitive data and functionality.
  • Configuring user access: ServiceNow administrators can configure user access to modules, applications, and data.

ServiceNow Configuration Management

ServiceNow configuration management involves configuring the various modules and applications within the ServiceNow platform. ServiceNow administrators can perform the following tasks related to configuration management:

  • Configuring modules: ServiceNow administrators can configure modules, including incident management, service request management, and change management, to meet the specific needs of the organization.
  • Configuring workflows: ServiceNow administrators can configure workflows to automate processes and ensure that tasks are completed in a timely and efficient manner.
  • Configuring notifications: ServiceNow administrators can configure notifications to inform users of important events and updates.
  • Configuring forms and fields: ServiceNow administrators can configure forms and fields to ensure that data is captured accurately and efficiently.

· 4 min read
Kaustubh Kulkarni

ServiceNow is a cloud-based software company that provides enterprise IT service management (ITSM) solutions. The company's platform allows organizations to automate their IT processes and workflows, manage incidents and service requests, and provide a single source of truth for IT operations. The purpose of this document is to provide a comprehensive introduction to ServiceNow, including its history, platform, modules, applications, integrations, and benefits.

History

ServiceNow was founded in 2004 by Fred Luddy, a former CTO of Peregrine Systems. Luddy wanted to create a cloud-based platform that could simplify and automate IT service management processes, replacing the outdated and cumbersome software that was commonly used at the time. Luddy's vision was to create a platform that would allow IT teams to work more efficiently and effectively, while also providing better visibility and control over their operations.

ServiceNow initially focused on providing ITSM solutions, but has since expanded its platform to include ITOM, ITBM, and CSM modules and applications. The company went public in 2012 and has since grown rapidly, with a market capitalization of over $100 billion as of 2021.

Platform

The ServiceNow platform is built on a proprietary framework called the ServiceNow Platform, which uses a single data model to store all information related to an organization's IT services. This allows for easy integration between different modules and applications within the platform, as well as with external systems.

The platform is designed to be highly customizable and flexible, with a range of configuration options available to meet the specific needs of different organizations. The platform also includes a range of tools for building custom applications and workflows, allowing organizations to extend the platform beyond the out-of-the-box modules and applications.

Modules and Applications

ServiceNow offers a range of modules and applications that can be customized and configured to meet the specific needs of different organizations. Some of the key modules and applications include:

IT Service Management (ITSM)

ITSM is the core module of the ServiceNow platform, providing a platform for managing incidents, service requests, and other IT-related tasks. ITSM includes a range of sub-modules, including:

  • Incident Management: provides a platform for tracking and managing IT incidents, including issue categorization, prioritization, and resolution.
  • Service Request Management: provides a platform for managing service requests from users, including requests for access, hardware, and software.
  • Problem Management: provides a platform for identifying and resolving the root cause of IT issues, reducing the likelihood of recurring incidents.
  • Change Management: provides a platform for managing changes to IT infrastructure and services, ensuring that changes are properly planned, documented, and approved.

IT Operations Management (ITOM)

ITOM provides a platform for monitoring and managing an organization's IT infrastructure, including servers, networks, and applications. ITOM includes a range of sub-modules, including:

  • Event Management: provides a platform for monitoring IT events and alerts, and automating responses to common issues.
  • Service Mapping: provides a platform for mapping the dependencies between IT services and infrastructure, improving visibility and understanding of IT operations.
  • Discovery: provides a platform for discovering and mapping IT infrastructure and services, including hardware, software, and network devices.
  • Orchestration: provides a platform for automating common IT tasks and workflows, reducing manual effort and increasing efficiency.

IT Business Management (ITBM)

ITBM provides a platform for managing IT projects and portfolios, including resource allocation and financial management. ITBM includes a range of sub-modules, including:

  • Project Portfolio Management: provides a platform for managing IT projects, including project planning, resource allocation, and financial management.
  • Agile Development: provides a platform for managing agile software development processes, including sprint planning, backlog management, and release management.
  • Financial Management: provides a platform for managing

· 2 min read
Kaustubh Kulkarni

Nowdays, mostly all of the site/blog owners are frustrated because of spammers, they put spam/phishing links in comments and contact forms also, whenver our geneuine users using site they may face problem because of this.

Now let's see how we can implement this,

assets/images/captcha.php
<?php
session_start();
if(isset($_SESSION['captcha']))
{
unset($_SESSION['captcha']);
//removing if captcha already set for session
}

$string1 = "abcdefghijklmnpqrstuvwxyz";
$string2 = "123456789";

$string = $string1.$string2;
//From these 2 random string will be generated
$string = str_shuffle($string);
$rand = substr($string,0,5);

$_SESSION['captcha']=$rand;
//setting new captcha string

/* Create an image in php */

$myimg = imagecreate(100, 30);
$background = imagecolorallocate($myimg, 199, 144, 225); // background color
$text_colour = imagecolorallocate ($myimg, 245, 245, 245); // text color
imagestring($myimg,12,25,8,$_SESSION['captcha'],$text_colour); // add captcha code in image
header ("Content-type: image/png");
imagepng ($myimg); // displayed image createde
imagedestroy($myimg); // remove allocated memory.

?>

Now on the login page just use one image tag with src as the path of captcha.php, and check the if captcha is valid using the session.

for example.

login-validate.php
<?php
session_start();
if(isset($_SESSION['captcha']))
{
if($_SESSION['captcha'] == $_POST['captcha']){
echo 'valid captcha';
}
else{
echo 'Invalid captcha';
}

}
else{
echo 'Please complete captcha';
}


?>

Now you can easily integrate this code in all of your pages where you expect the input from users.

· 11 min read
Kaustubh Kulkarni

Installation

Uploading Files

To upload files, first we need to download them from EasyURLs repository

You can download any stable release here

Once source code is downloaded. Now visit your website's CPanel. You can access your cpanel from your hosting provider's site or you can directly access using cpanel.yoursite.com or yoursite.com/cpanel .

Once you accessed your CPanel we will be moving to upload our files on CPanel Account . To upload click on File Manager and Go to Public_html folder and create desired folder. How to Install FREE EasyURLS on CPanel in 5 minutes?

Suppose you want to add your software at example.com/url then create a folder url inside your public_html folder.

Now upload the .zip file we downloaded from above link. Now we have to extract that file. After extraction, you will get a folder with the same name as our zip file name. Now we can securely delete that zip file. Now move the content from our EasyURLs-master . folder to our link folder.

tha's it. we completed our first task to upload required files to the server.

Database Part

Creating Database

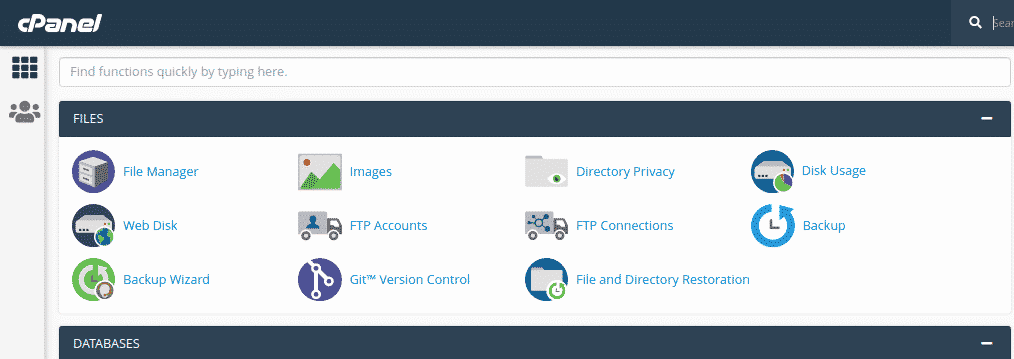
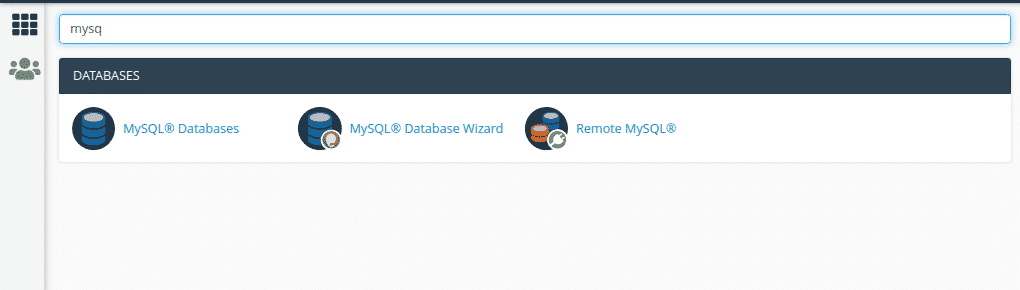
To create database click on MySQL Databases. see image below. option 1 to be selected. How to Install FREE EasyURLS on CPanel in 5 minutes?

Once you click you will be redirected to page where it will ask you the name of database. You have to enter database name you want to use. Keep Good & understandable database name & click on Create Database.
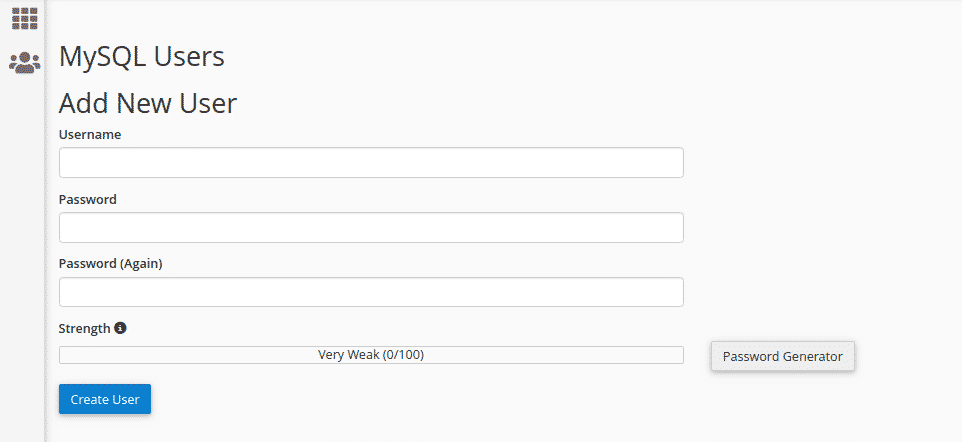
 How to Install FREE EasyURLS on CPanel in 5 minutes?

Creating A User

Once the database is created. we have to create a user to access the database we just created. To create users just scroll down. You will get the option to Add New User. Create a username & you can use a password generator to generate passwords. Keep all this data safe and secure. we need all this data while setting up your app. How to Install FREE EasyURLS on CPanel in 5 minutes?

Authorizing the user to use database

The last step & important step is to authorize user to use our database. Just scroll more you will find Add User to Database option. How to Install FREE EasyURLS on CPanel in 5 minutes?

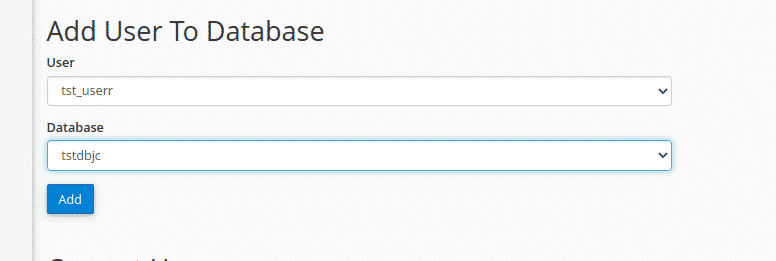
Now select the user and appropriate database and click on Add button. Now you will be redirected to another page. Where you are required to select the rights to users on the database. simply select ALL PRIVILEGES. How to Install FREE EasyURLS on CPanel in 5 minutes?

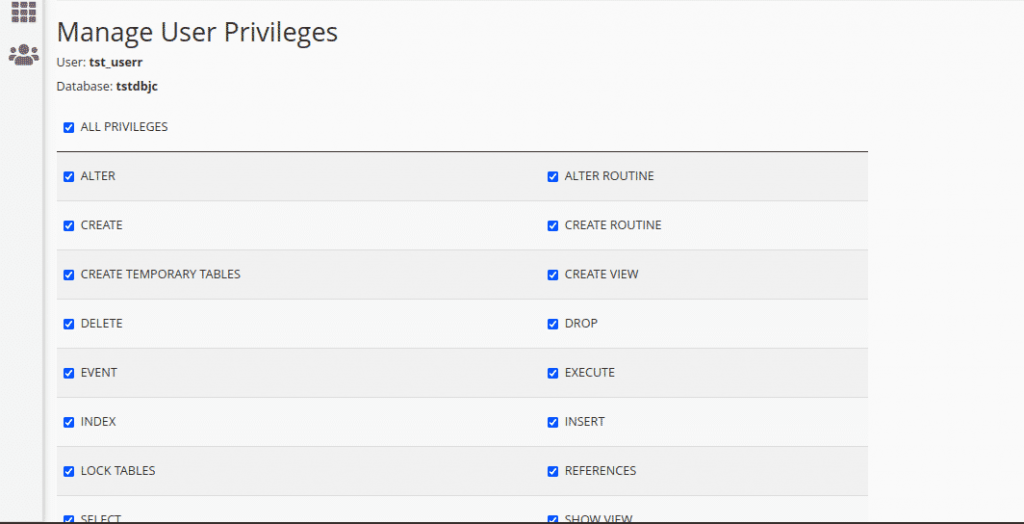
Now click on Make Changes . Done, we have done database part too.

Configuration

Note : If needed you can install free ssl certificate, to install ssl please read this article

Now visit yoursite.com/link or yoursite.com on which path you uploaded files in last step, it will redirect you to yoursite.com/install.php

Installation Process

In form below enter the following details, to install application.

  • Host : If you are installing on same server use localhost, if you are using external database make please use IP Address and port 3306 e.g. 1.1.1.1:3306, You have to start access in MySQL remote database else it will not work
  • Database username : enter username generated in last step
  • Database Password : enter db user's password
  • Database Name : now database name

Important : If you see error, please check your database credentials, if those are correct and you are still facing issue then please give database access to user Read more

If you don't see any errors, then you completed setup correctly, In next step enter

  • Username : this is just short name for login e.g. admin,peter etc.
  • Email : enter valid email id, After new update you will be able to reset your password with this mail, So enter correct mail id.
  • Password : Use strong password, keep it secure.

Click on Complete Installation, Now it will show that installation has been completed. it will take you automatically to login page.

note

If you face any issue during installation & unable to complete installation, Please delete config.php file and start process again, also create database again

login

danger

After successful installation, it automatically deletes install.php and install2.php, if it does not delete, Please delete both files manually.

Visit yoursite.com/login.php to login your site, enter email or username and password & click login to access dashboard.

Managing EasyURLS

Link

Creating URL

After login click Manage URLS on navigation bar now you can see all the links created by you as we are creating our first link click on add new link enter long URL after that enter short URL it will show you availability, if the URL is available click on add it will create short url. To copy short url, Right click on short code and click Copy Link Address

Deleting URL

To delete URL Manage Links --> All Links, Click Delete button next to any url to delete that URL

Editing URL

In current version of EasyURLs, it's not possible to edit any url, But you can delete old url and add new url.

Searching

To search short url just start typing in above search bar, it will automatically filter urls, with your search query.

Download Excel

You can download excel file of all the urls generated, to download visit Manage Links --> All Links --> Download Excel, it will download .xls file, if you see any warning please ignore the excel file is safe to use.

Managing Users

Link

Adding Users

After login click Manage Users on navigation bar now you can see all the Users in system.Click on Add New Link enter Email,Username,Password, if the Email and Username is available click on add it will add new user in System.

Deleting User

To delete URL Manage Users --> All Users, Click Delete button next to any user to delete that User

Password Reset

Just click on Reset button next to email of user and it will generate temporary password for the user, you can share with user and after that they can change their password from their profile.

Searching Users

To search user url just start typing in above search bar, it will automatically filter users, with your search query.

Download User Excel

You can download excel file of all the users generated, to download visit Manage Users --> All Users --> Download Excel, it will download .xls file, if you see any warning please ignore the excel file is safe to use.

Managing Profile

Link

You can edit your username, email and password, Just click on whatever you want edit and add new value then click update.

Make sure if you don`t want to change password then keep those fields as it is, same for username and email.

API

Link

Adding Keys

After login click API on navigation bar now you can see all the API KEYS in system.Click on Add New API KEY then enter KEY NAME, please note that key will be auto-generated, after that click on Add New API Key it will add new API KEY in System.

Deleting Key

To delete URL API --> All KEYS, Click Delete button next to any KEY to delete that API KEY, Once key is deleted all the applications using that key will stop working.

Editing Key

You can not edit any key, But you can delete and create new key.

API Guide

You can use API once you generate api key.

To get all links with details use

Request
// base url
your_domain.com/api.php

Request type : `GET`

// following parameters are required

`API_KEY` : Enter key you generated in last step
`TYPE` : `LINKS`

You will get response in json , for e.g.

response.json
[
{
"ID":"1",
"SHORT_URL":"pDWOBz",
"LONG_URL":"https://www.google.com",
"COUNT":"0"
},
{
"ID":"2",
"SHORT_URL":"CIKH-f",
"LONG_URL":"https://microsoft.com",
"COUNT":"0"
},
{
"ID":"3",
"SHORT_URL":"FnMDHT",
"LONG_URL":"https://kaustubhk24.netlify.app",
"COUNT":"0"
},
{
"ID":"4",
"SHORT_URL":"an2pr6",
"LONG_URL":"https://justinclicks.com",
"COUNT":"0"
},
{
"ID":"5",
"SHORT_URL":"Esh4Cg",
"LONG_URL":"https://example.com/affiliate",
"COUNT":"0"
}
]

To get specific link with details use

Request
// base url
your_domain.com/api.php

Request type : `GET`

// following parameters are required

`API_KEY` : Enter key you generated in last step
`TYPE` : `VIEW`
`LINK_ID` : int LINK_ID e.g. 1

You will get response in json , for e.g.

response.json
[
{
"ID":"6",
"SHORT_URL":"UMYi2",
"LONG_URL":"https://facebook.com",
"COUNT":"0"
}
]

To add new link we have 2 ways

If you want specific short link for given long_url, please pass params as follow

Request
// base url
your_domain.com/api.php

Request type : `GET`

// following parameters are required

`API_KEY` : Enter key you generated in last step
`TYPE` : `ADD`
`SHORT_URL` : short_url you want to set, do not use domain, use only code e.f. xyz
`LONG_URL` : LONG_URL is url where you want to redirect your short url

If you want to generate short code automatically

Request
// base url
your_domain.com/api.php

Request type : `GET`

// following parameters are required

`API_KEY` : Enter key you generated in last step
`TYPE` : `ADD`
`LONG_URL` : LONG_URL is url where you want to redirect your short url

You will get following response in both cases,

response.json
URL added[
{
"ID":"6",
"SHORT_URL":"UMYi2",
"LONG_URL":"https://facebook.com",
"COUNT":"0"
}
]

To delete link

Request
// base url
your_domain.com/api.php

Request type : `GET`

// following parameters are required

`API_KEY` : Enter key you generated in last step
`TYPE` : `DELETE`
`LINK_ID` : int LINK_ID e.g. 1

You will get following response

response.json
Deleted

Managing Users

Getting All Users

To get all users with details use

Request
// base url
your_domain.com/api.php

Request type : `GET`

// following parameters are required

`API_KEY` : Enter key you generated in last step
`TYPE` : `USERS`

You will get response in json , for e.g.

response.json
[
{
"USER_ID":"1",
"USERNAME":"kaustubh",
"EMAIL":"info@example.com"
},
{
"USER_ID":"2",
"USERNAME":"kk",
"EMAIL":"info@example.com"
}
]

Getting Specific Users Details

To get specific user with details use

Request
// base url
your_domain.com/api.php

Request type : `GET`

// following parameters are required

`API_KEY` : Enter key you generated in last step
`TYPE` : `VIEW`
`USER_ID` : int USER_ID e.g. 1

You will get response in json , for e.g.

response.json
[
{
"USER_ID":"1",
"USERNAME":"kaustubh",
"EMAIL":"info@example.com"
}
]

Adding User

To add user

Request
// base url
your_domain.com/api.php

Request type : `GET`

// following parameters are required

`API_KEY` : Enter key you generated in last step
`TYPE` : `ADD`
`EMAIL` : users email
`USERNAME` : username for login
`PASSWORD` : send non-encrypted password, it will be automatically encrypted.

You will get following response

response.json
User added[
{
"USER_ID":"14",
"USERNAME":"test",
"EMAIL":"in@demo.com"
}
]

Deleting User

To delete user

Request
// base url
your_domain.com/api.php

Request type : `GET`

// following parameters are required

`API_KEY` : Enter key you generated in last step
`TYPE` : `DELETE`
`USER_ID` : int USER_ID e.g. 1

You will get following response

response.json
Deleted

Common Errors

You may face following issues while using api, so it is recommended to handle all of these exceptions.

  • Invalid Operation : You have to pass correct operation in TYPE parameter, else API request will be rejected with above error.
  • Invalid API Key : Please check if you are passing active API key to API_KEY with no spaces in both sides.
  • Database Not Reachable : Check if your database is not overloaded.

Contribute

You can contribute in 3 ways

Core files

While making changes in core files please add comments in code, make sure your code does not break any previously written code.

Translations

To contribute language, please visit assets/local

Editing Current Translations

Visit any language file you want, please note we're using iso language code for file name, for example, file name for Hindi language will be hi.php, After making changes please create pull request.

Adding New Language

To add new language please find correct ISO code of language you are adding and create file with ISO_LANGUAGE_CODE.php, for example name for Hindi language file will be hi.php, Now copy the text from sample.php and paste it in file you just created and replace array values as required.

language.php
"Language"=>"Language Name you want to show",
..
...
// Now complete all remaining fields

After that open index.php and add new array key and value for language

index.php
$languages = array(
"English"=>"en",
"मराठी"=>"mr",
"हिंदी"=>"hi"
);


Please make sure array key must be Name of language and array value must be iso code of language.

After committing changes please make pull request.

To Sponsor project please visit https://github.com/kaustubhk24/EasyURLs and Click on Sponsor button.

· 3 min read
Kaustubh Kulkarni

Are you looking for status page for your site/sites? Many times we need to check if our site is working properly or not, So I developed this tool, You can easily host it on GitHub Pages and by just making few changes you can create status page for your website & as it is hosted on GitHub pages, it is completely free to use. See Live App Preview

How to Create Status Page for your site?

  • To create status Page first fork https://github.com/kaustubhk24/FREE-Site-Status-Page repository.
  • Go to repository setting and turn on GitHub pages option.
  • In Next Step open file named CNAME & remove text status.justinclicks.com and enter your custom URL. e.g. status.example.com
  • From repo settings enable tick on SSL & update records respectively in your domain DNS settings.
  • Last step is to open main.js & you will see code below, you just need to add your sites there.
main.js
sites=[
{
'site_name':'Example.com',
'site_url':'https://www.example.com/'
},

{
'site_name':'Sub Example',
'site_url':'https://sub-domain.example.com/'
}
]
  • Now at the place of site_name you have to enter your site Title & in site_url enter exact URL of your site with http or https properly.
  • Make sure you haven't kept any previous site name, just remove all of them & add yours
  • Now create file in incidents/ folder with site name for example if your site name is Example Site in main.js then your file name will be Example Site.json, Do not remove spaces or anything , use exact site name from main.js & keep file in incidents/ folder .
  • To report incident open your site file from incidents/ folder, & copy content below there
incidents/site_name.json
[
{
"incident_name":"incident_name at time",
"description":"description"
},
{
"incident_name":"incident_name 2 at time",
"description":"description 2"
}
]

  • Make changes according to your requirements, that's it
  • Done ! Once GitHub Build pages your site status page will be Live.

Issues

Live Preview GIF

Status PageIncidents Page

Disclaimer

We have tried our best to keep the code bug free, users are requested to confirm information with their sites before using the information provided. The author reserves the right not to be responsible for the topicality, correctness, completeness or quality of the information provided. Liability claims regarding damage caused by the use of any information provided, including any kind of information which is incomplete or incorrect, will therefore be rejected.

Licensing

You are free to download / modify / sell code but with terms below but not limited to,

  • You should not remove footer credits and links
  • You can not add your footer credits
  • You should remove JustInClicks links from main.js files, you should keep only your links
  • All use and/or publication rights are reserved worldwide.
  • Copyrights © 2021 Kaustubh Kulkarni { Kaustubhk24 }