
Many times while working on static sites we need HTML forms to embeded on our site, We found several articles submitting HTML form to Google Sheets, but in 2021 all of them are out of date, this is latest method you should follow to Submit HTML Form To Google Sheet.
Making HTML Form
First you should have HTML form with you, if you don't have any form now, then for example you can freely copy paste our form, see example Registration-file.html form.
<!DOCTYPE html>
<html>
<head>
    <title> Registration Form</title>
</head>
<body>
    <h1 align="center">  Registration form</h1>
    <form target="_blank" action="save-on-drive.html" method="GET">
        <table align="center" title="User Registration form">
            <tr>
                <td>
                      First Name
                </td>
                <td>
                    <input type="text" name="FirstName" style="width: 200px" pattern="[A-Za-z]{3,10}">
                </td>
            </tr>
             <tr>
                <td>
                     Last Name
                </td>
                <td>
                    <input type="text" name="LastName" style="width: 200px" pattern="[A-Za-z]{3,10}">
                </td>
            </tr>
             <tr>
                <td>
                     Email
                </td>
                <td>
                    <input type="Email" name="Email" style="width: 200px">
                </td>
            </tr>
             <tr>
                <td>
                    Mobile Number
                </td>
                <td>
                    <input type="tel" name="MobileNo" style="width: 200px"  required >
                </td>
            </tr>
            <tr></tr>
            <tr>
                <td  colspan="2">
                    <input type="Submit" name="Submit" style="width: 200px">
                </td>
            </tr>
        </table>
    </form>
</body>
</html>
While You create and complete form to Submit in Google Sheets,
Make sure you have
- Used GET Method
- In Action you must have the exact path of save-on-drive.html file
- Use Target blank , if you want to submit form in another new tab, if not just remove the target attribute
Setting Up Google Sheet To Submit HTML
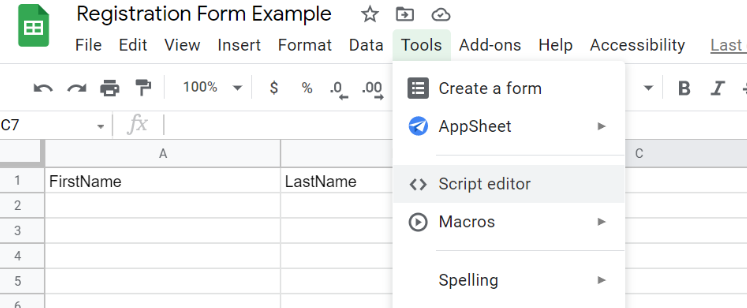
First create Google Sheet , if you don't have one.
Now let's link google form to sheet, So that we can submit HTML Form To Google Sheet.
Click on Script Editor, Now it will open editor in next screen,
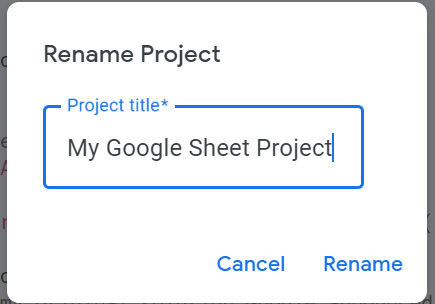
Now we will rename Our project , To rename just click on Untitled Project & in popup enter new project name and click rename.
Now remove firstly written function from there and copy paste code below there, and click on save button icon , Once saved we will move forward for initial setup, For initial setup,
function doGet(e){
  return handleResponse(e);
}
//  Enter sheet name where data is to be written below
        var SHEET_NAME = "Sheet1";
var SCRIPT_PROP = PropertiesService.getScriptProperties(); // new property service
function handleResponse(e) {
  // shortly after my original solution Google announced the LockService[1]
  // this prevents concurrent access overwritting data
  // [1] http://googleappsdeveloper.blogspot.co.uk/2011/10/concurrency-and-google-apps-script.html
  // we want a public lock, one that locks for all invocations
  var lock = LockService.getPublicLock();
  lock.waitLock(30000);  // wait 30 seconds before conceding defeat.
  try {
    // next set where we write the data - you could write to multiple/alternate destinations
    var doc = SpreadsheetApp.openById(SCRIPT_PROP.getProperty("key"));
    var sheet = doc.getSheetByName(SHEET_NAME);
    // we'll assume header is in row 1 but you can override with header_row in GET/POST data
    var headRow = e.parameter.header_row || 1;
    var headers = sheet.getRange(1, 1, 1, sheet.getLastColumn()).getValues()[0];
    var nextRow = sheet.getLastRow()+1; // get next row
    var row = [];
    // loop through the header columns
    for (i in headers){
      if (headers[i] == "Timestamp"){ // special case if you include a 'Timestamp' column
        row.push(new Date());
      } else { // else use header name to get data
        row.push(e.parameter[headers[i]]);
      }
    }
    // more efficient to set values as [][] array than individually
    sheet.getRange(nextRow, 1, 1, row.length).setValues([row]);
    // return json success results
    return ContentService
          .createTextOutput(JSON.stringify({"result":"success", "row": nextRow}))
          .setMimeType(ContentService.MimeType.JSON);
  } catch(e){
    // if error return this
    return ContentService
          .createTextOutput(JSON.stringify({"result":"error", "error": e}))
          .setMimeType(ContentService.MimeType.JSON);
  } finally { //release lock
    lock.releaseLock();
  }
}
function setup() {
    var doc = SpreadsheetApp.getActiveSpreadsheet();
    SCRIPT_PROP.setProperty("key", doc.getId());
}

Click on Setup Button to start setup
Once you start setup it will show you message that Authorization Required, Now let's authorize it,
It will ask you for some permissions , So simply allow all the permission , So that we can submit html form to google sheets,
Next step will be deployment,
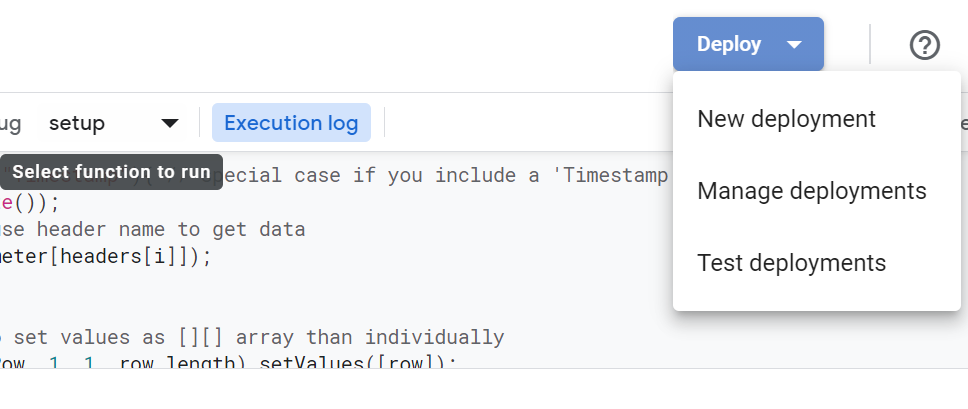
Click on Deploy button and Select option New deployment
In Select Type select option Web app from list, this is last step on Google sheet site,
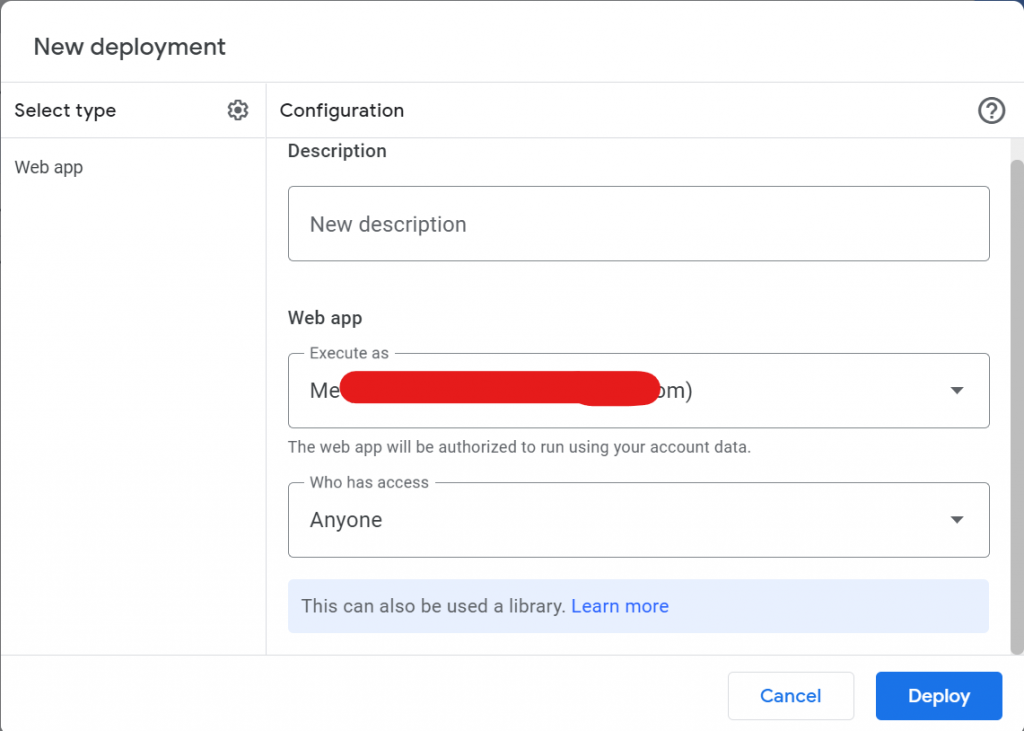
In configuration in Description, enter description of project ( Not required ) , this is not compulsory
In next box in Execute as box you will see your email , keep as it is,
In last Who has access select option Anyone, & Click on Deploy
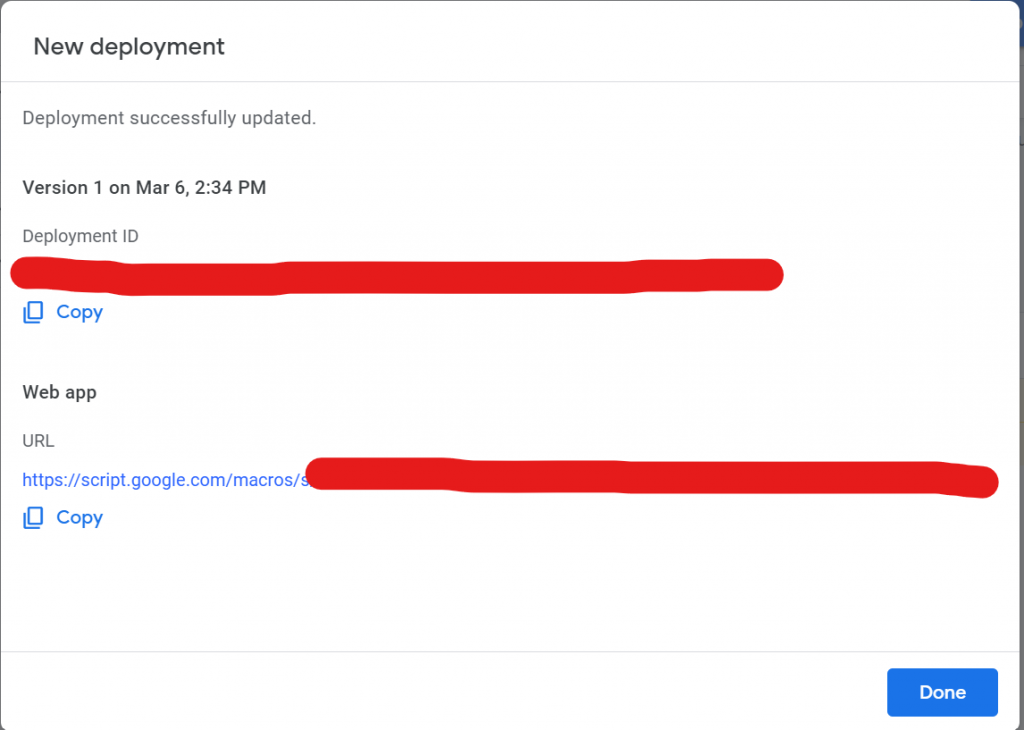
From this window copy URL & keep it safe,
Creating File To Submit Data
In last step create file save-on-drive.html and just update url you copied from Google site, that's it, Your app is ready, You can use,
<!DOCTYPE html>
<html lang="en">
<head>
    <meta charset="UTF-8">
    <meta http-equiv="X-UA-Compatible" content="IE=edge">
    <meta name="viewport" content="width=device-width, initial-scale=1.0">
    <title>Your Information has been Saved</title>
</head>
<script type="text/javascript">
var url_string = window.location.href;
var url = new URL(url_string);
var FirstName = url.searchParams.get("FirstName");
var LastName = url.searchParams.get("LastName");
var Email = url.searchParams.get("Email");
var MobileNo = url.searchParams.get("MobileNo");
var request = new XMLHttpRequest();
request.onreadystatechange = function() {
    if (this.readyState == 4 && this.status == 200) {
        console.log(this.responseText);
    }
};
var final_url="https://script.google.com/macros/s/your-script-id/exec?FirstName=";
final_url=final_url+FirstName+"&LastName="+LastName+"&Email="+Email+"&MobileNo="+MobileNo;
request.open('GET', final_url);
request.send();
</script>
<body>
 <h1 id="confirmation"> Your Information has been saved</h1>
<script type="text/javascript">
</script>
</body>
</html
Video
Download Complete Project
This project example is now available for free, Get it while it's free.
Download complete source code from link below