Installation
Uploading Files
To upload files, first we need to download them from EasyURLs repository
You can download any stable release here
Once source code is downloaded. Now visit your website's CPanel. You can access your cpanel from your hosting provider's site or you can directly access using cpanel.yoursite.com or yoursite.com/cpanel .
Once you accessed your CPanel we will be moving to upload our files on CPanel Account .
To upload click on File Manager and Go to Public_html folder and create desired folder.

Suppose you want to add your software at example.com/url then create a folder url inside your public_html folder.
Now upload the .zip file we downloaded from above link. Now we have to extract that file. After extraction, you will get a folder with the same name as our zip file name. Now we can securely delete that zip file. Now move the content from our EasyURLs-master . folder to our link folder.
tha's it. we completed our first task to upload required files to the server.
Database Part
Creating Database
To create database click on MySQL Databases. see image below. option 1 to be selected.

Once you click you will be redirected to page where it will ask you the name of database. You have to enter database name you want to use. Keep Good & understandable database name & click on Create Database.

Creating A User
Once the database is created. we have to create a user to access the database we just created. To create users just scroll down. You will get the option to Add New User. Create a username & you can use a password generator to generate passwords. Keep all this data safe and secure. we need all this data while setting up your app.

Authorizing the user to use database
The last step & important step is to authorize user to use our database. Just scroll more you will find Add User to Database option.

Now select the user and appropriate database and click on Add button. Now you will be redirected to another page. Where you are required to select the rights to users on the database. simply select ALL PRIVILEGES.
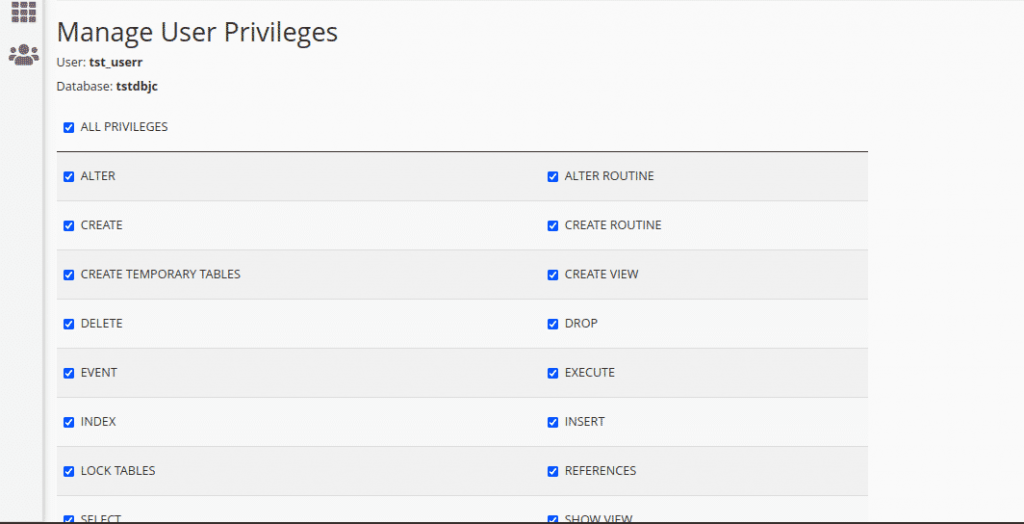
Now click on Make Changes . Done, we have done database part too.
Configuration
Note : If needed you can install free ssl certificate, to install ssl please read this article
Now visit yoursite.com/link or yoursite.com on which path you uploaded files in last step, it will redirect you to yoursite.com/install.php
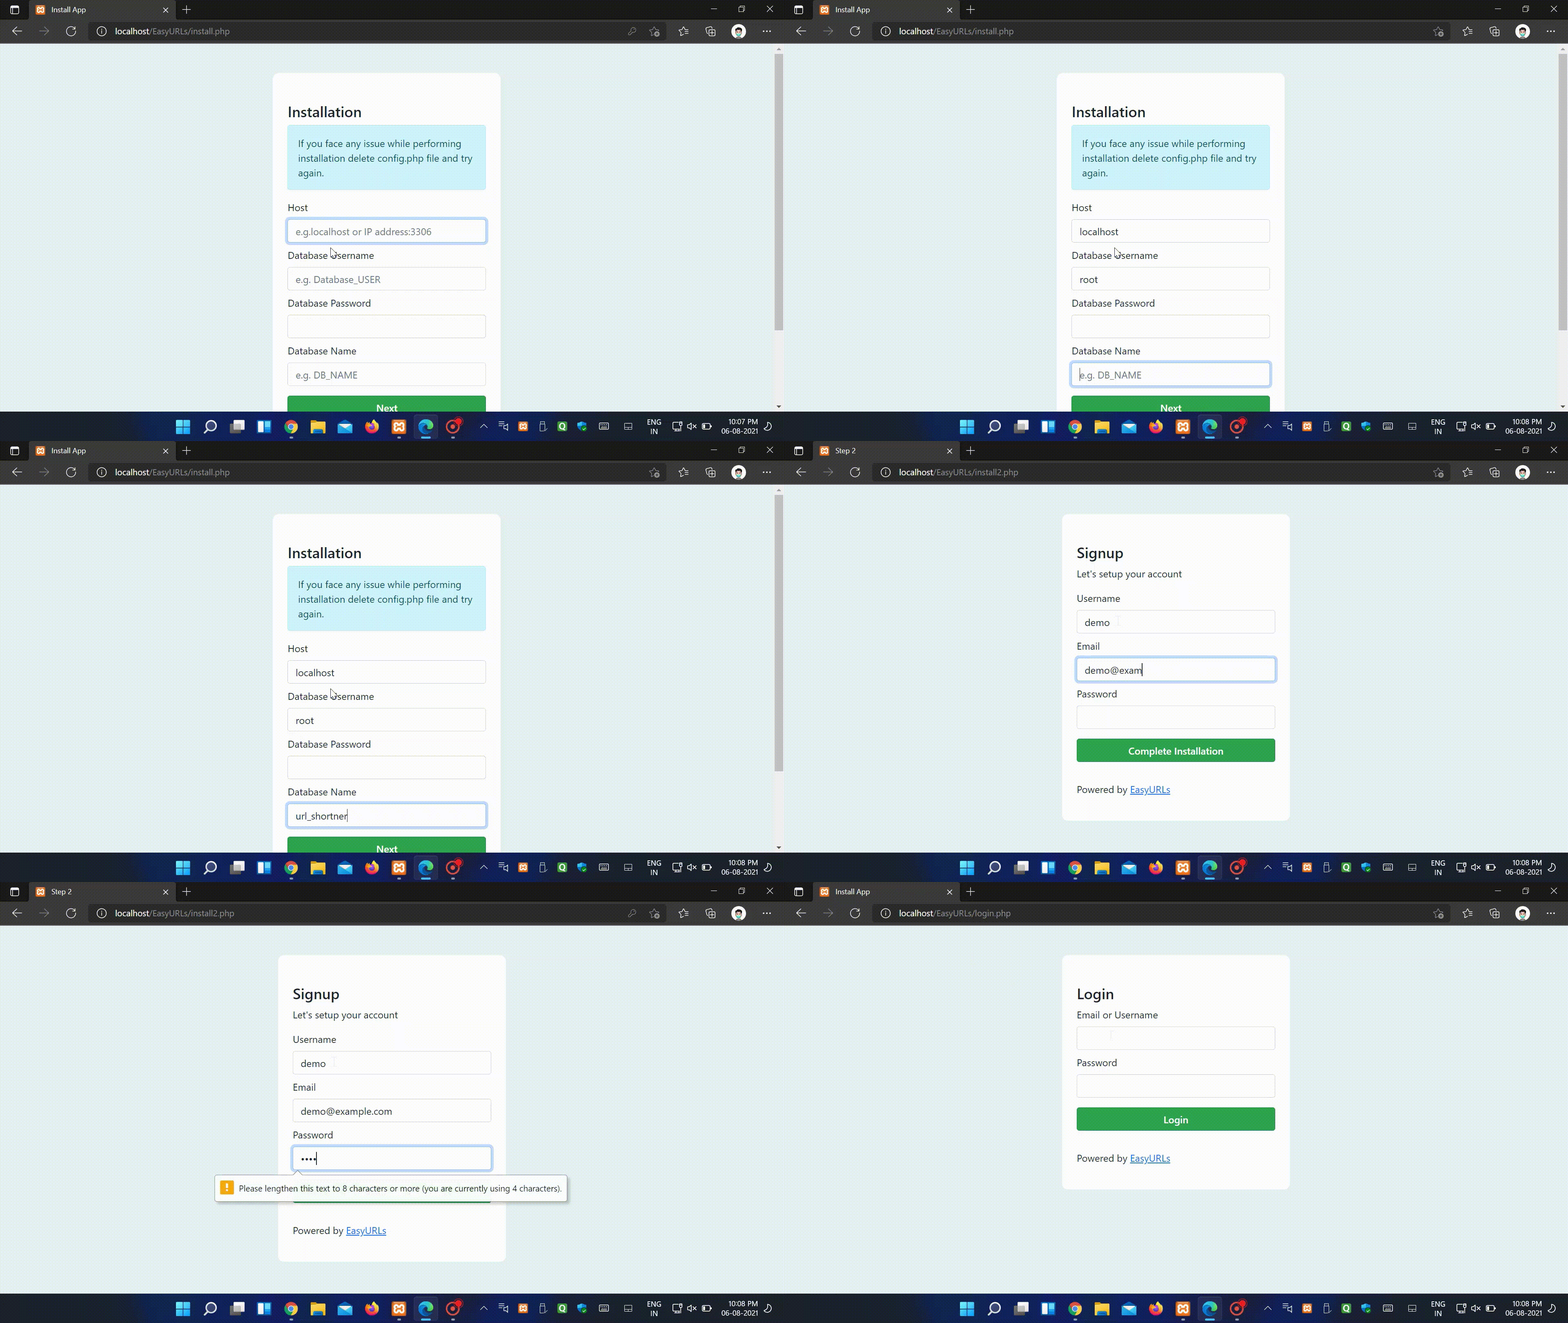
In form below enter the following details, to install application.
- Host : If you are installing on same server use
localhost, if you are using external database make please use IP Address and port 3306 e.g.1.1.1.1:3306, You have to start access in MySQL remote database else it will not work - Database username : enter username generated in last step
- Database Password : enter db user's password
- Database Name : now database name
Important : If you see error, please check your database credentials, if those are correct and you are still facing issue then please give database access to user Read more
If you don't see any errors, then you completed setup correctly, In next step enter
- Username : this is just short name for login e.g. admin,peter etc.
- Email : enter valid email id, After new update you will be able to reset your password with this mail, So enter correct mail id.
- Password : Use strong password, keep it secure.
Click on Complete Installation, Now it will show that installation has been completed. it will take you automatically to login page.
If you face any issue during installation & unable to complete installation, Please delete config.php file and start process again, also create database again
login
After successful installation, it automatically deletes install.php and install2.php, if it does not delete, Please delete both files manually.
Visit yoursite.com/login.php to login your site, enter email or username and password & click login to access dashboard.
Managing EasyURLS
Creating URL
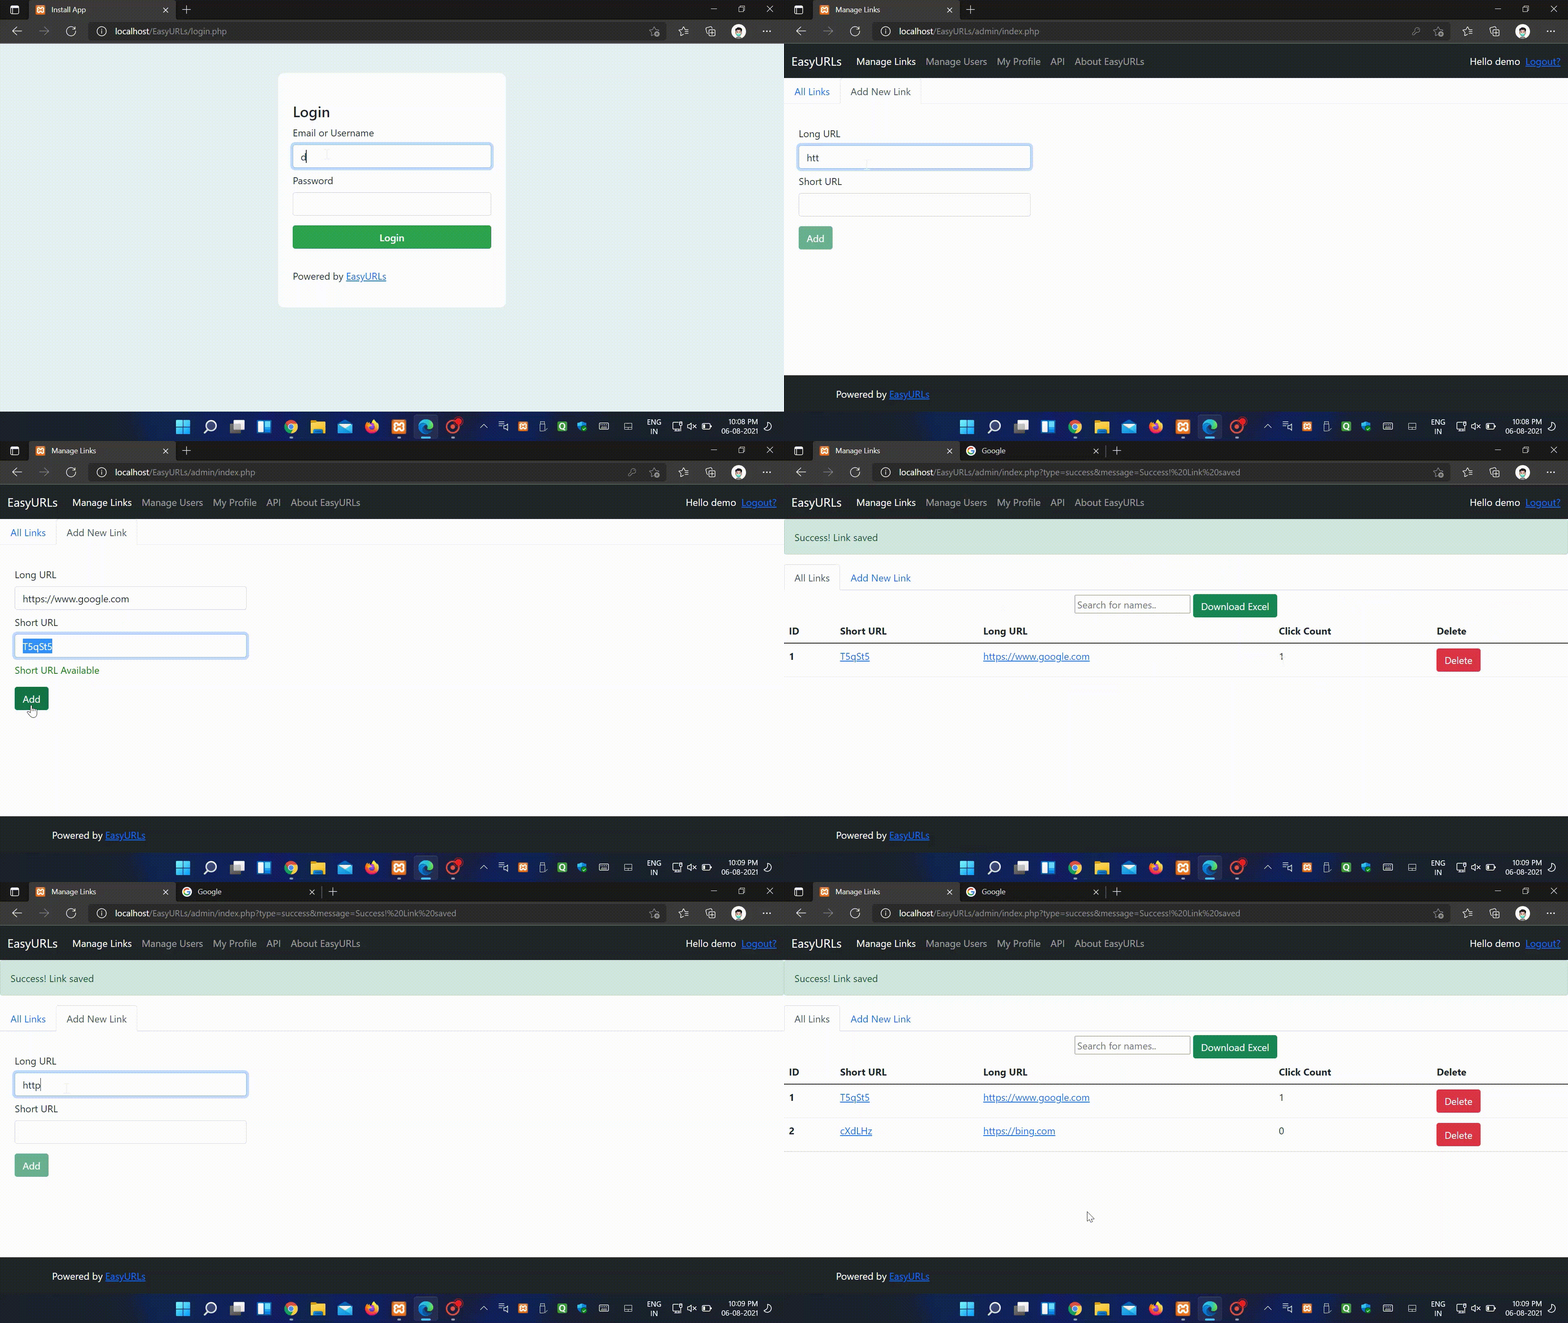
After login click Manage URLS on navigation bar now you can see all the links created by you as we are creating our first link click on add new link enter long URL after that enter short URL it will show you availability, if the URL is available click on add it will create short url. To copy short url, Right click on short code and click Copy Link Address
Deleting URL
To delete URL Manage Links --> All Links, Click Delete button next to any url to delete that URL
Editing URL
In current version of EasyURLs, it's not possible to edit any url, But you can delete old url and add new url.
Searching
To search short url just start typing in above search bar, it will automatically filter urls, with your search query.
Download Excel
You can download excel file of all the urls generated, to download visit Manage Links --> All Links --> Download Excel, it will download .xls file, if you see any warning please ignore the excel file is safe to use.
Managing Users
Adding Users
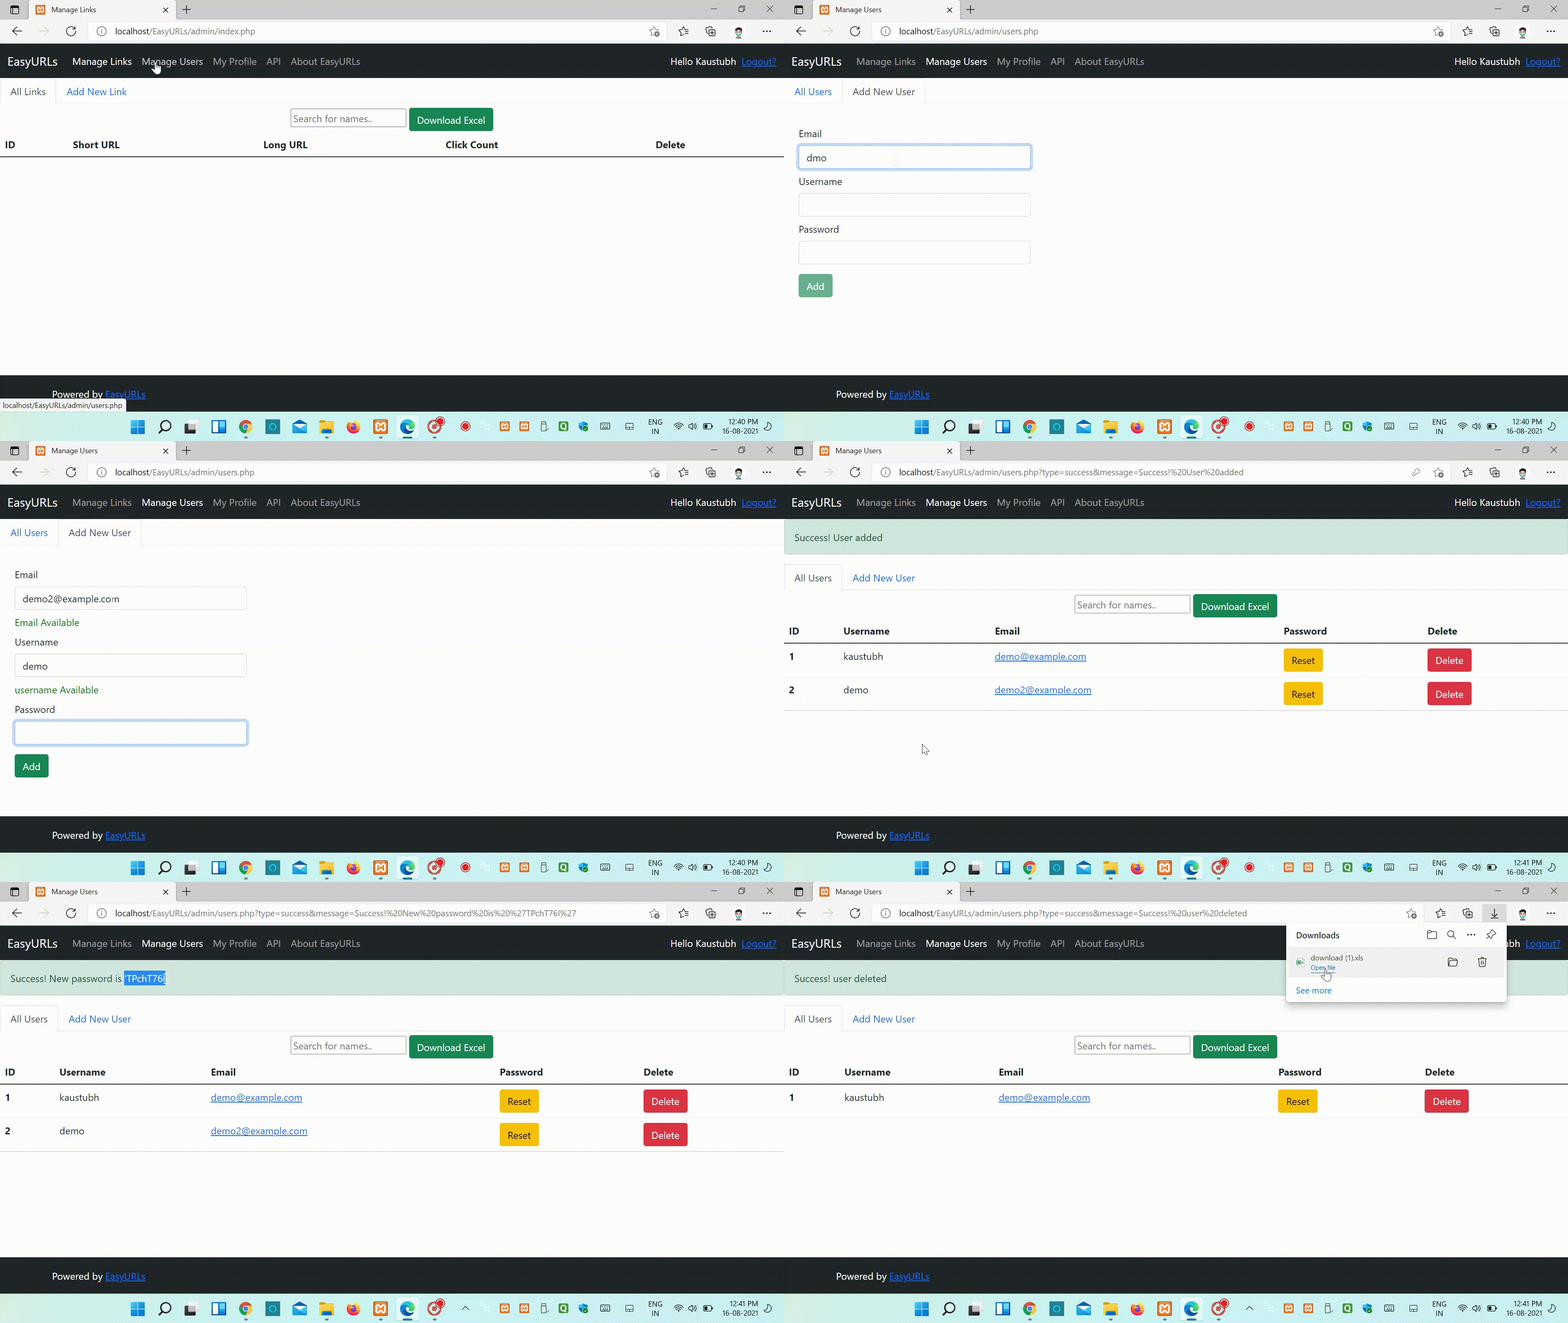
After login click Manage Users on navigation bar now you can see all the Users in system.Click on Add New Link enter Email,Username,Password, if the Email and Username is available click on add it will add new user in System.
Deleting User
To delete URL Manage Users --> All Users, Click Delete button next to any user to delete that User
Password Reset
Just click on Reset button next to email of user and it will generate temporary password for the user, you can share with user and after that they can change their password from their profile.
Searching Users
To search user url just start typing in above search bar, it will automatically filter users, with your search query.
Download User Excel
You can download excel file of all the users generated, to download visit Manage Users --> All Users --> Download Excel, it will download .xls file, if you see any warning please ignore the excel file is safe to use.
Managing Profile
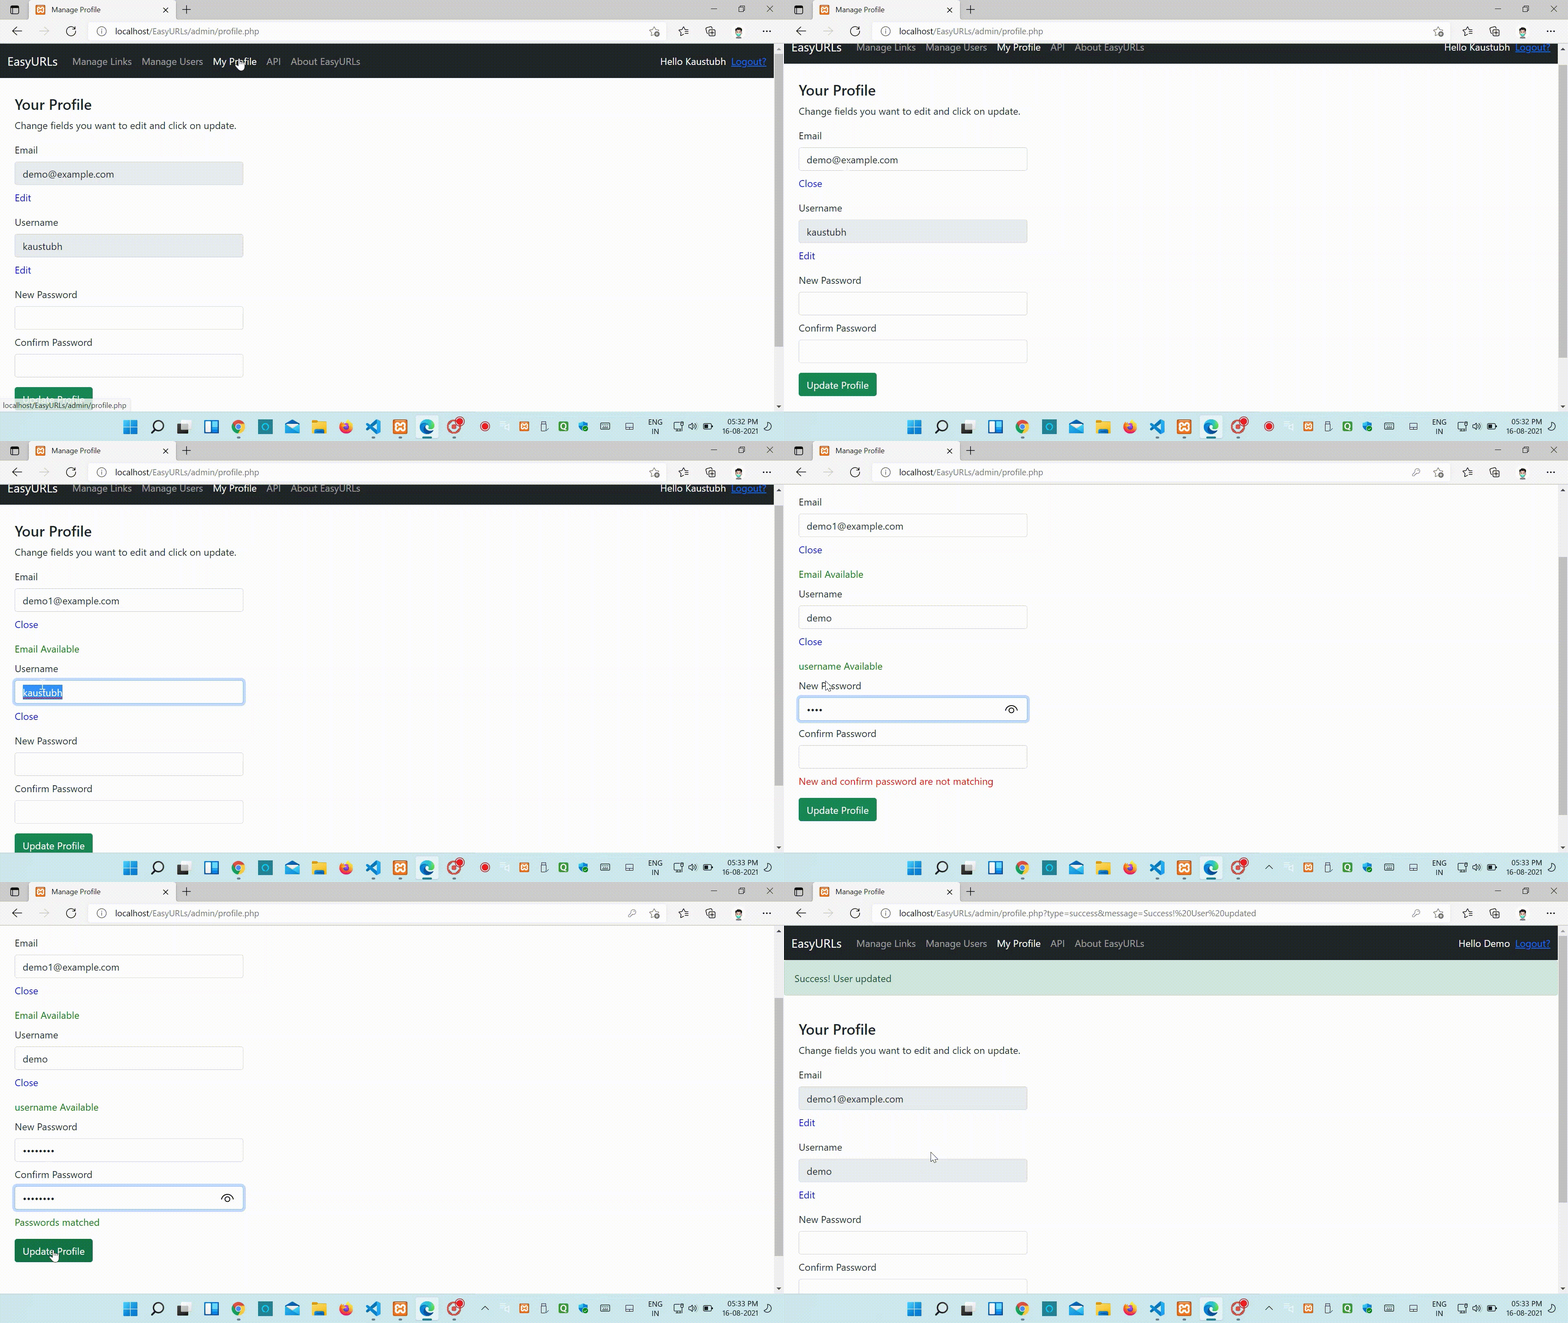
You can edit your username, email and password, Just click on whatever you want edit and add new value then click update.
Make sure if you don`t want to change password then keep those fields as it is, same for username and email.
API
Adding Keys
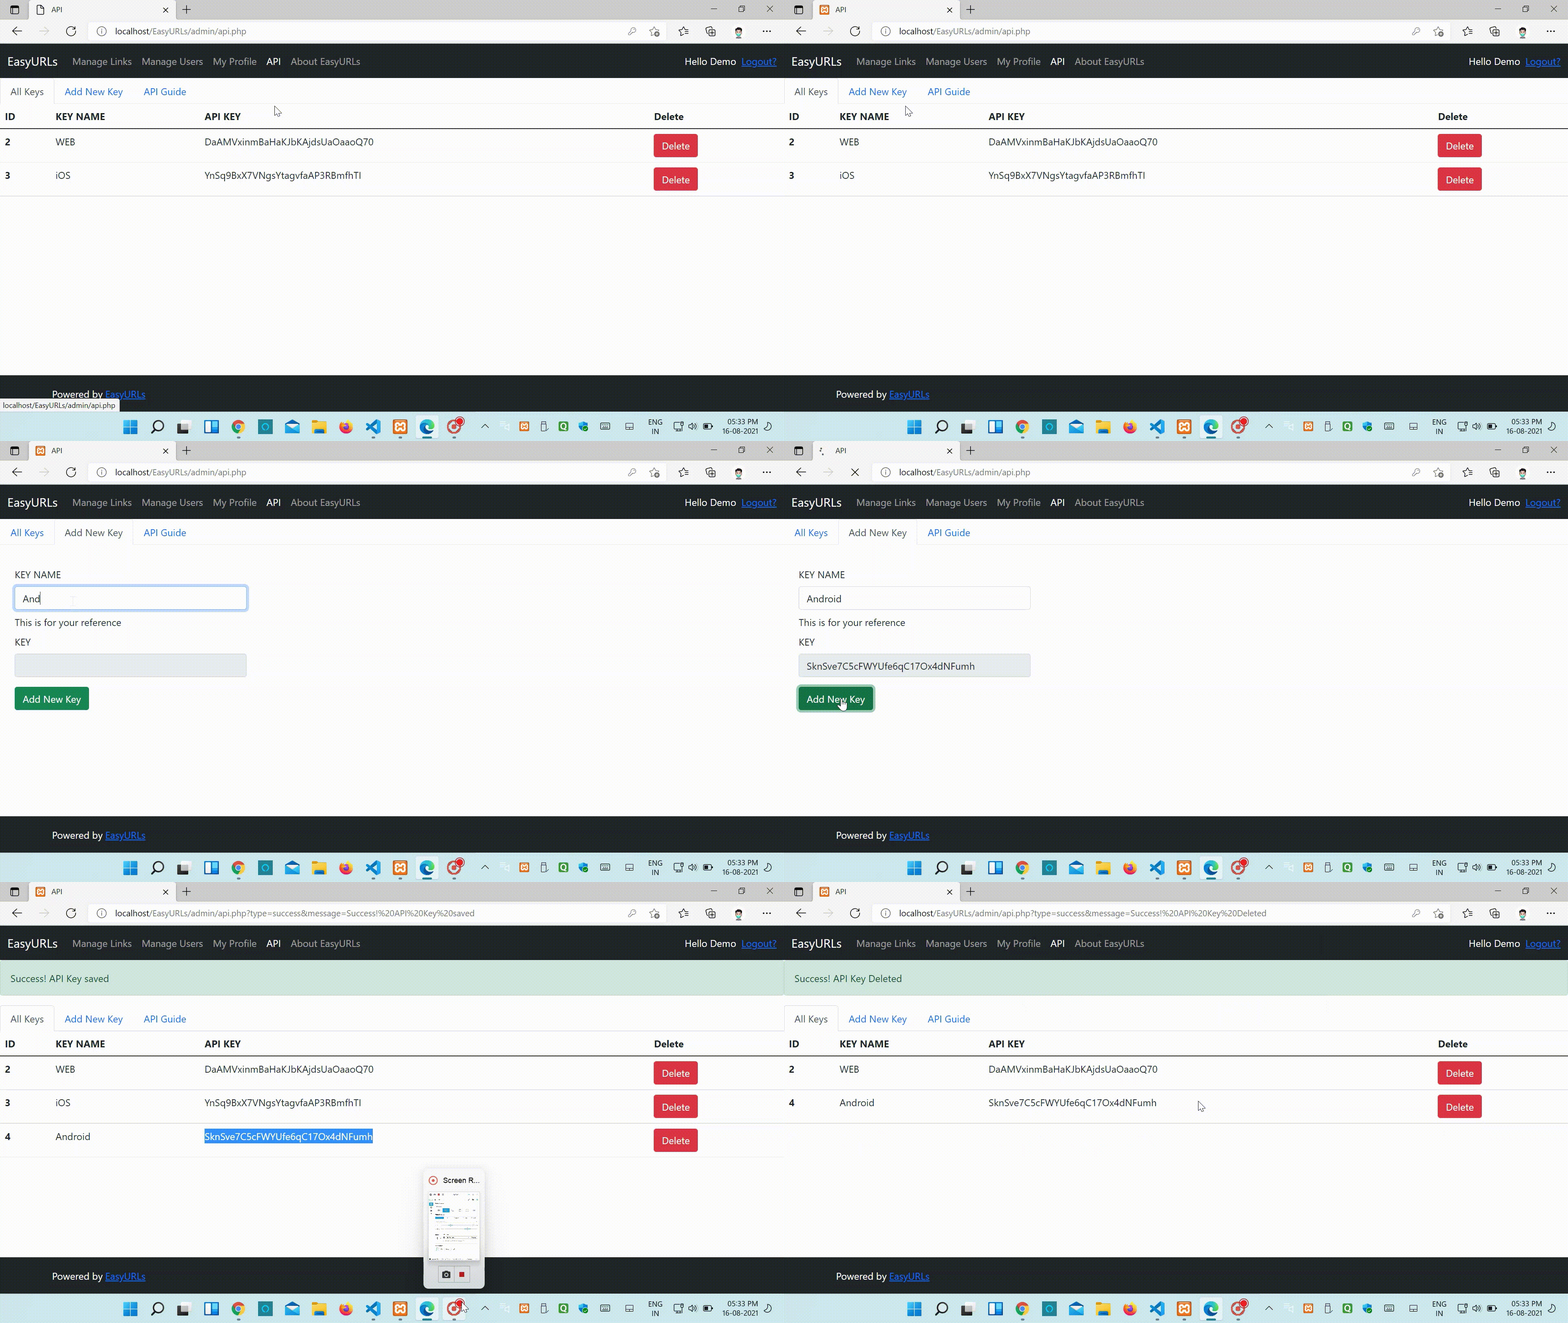
After login click API on navigation bar now you can see all the API KEYS in system.Click on Add New API KEY then enter KEY NAME, please note that key will be auto-generated, after that click on Add New API Key it will add new API KEY in System.
Deleting Key
To delete URL API --> All KEYS, Click Delete button next to any KEY to delete that API KEY, Once key is deleted all the applications using that key will stop working.
Editing Key
You can not edit any key, But you can delete and create new key.
API Guide
You can use API once you generate api key.
Managing Links
Getting All Links
To get all links with details use
// base url
your_domain.com/api.php

Request type : `GET`

// following parameters are required

`API_KEY` : Enter key you generated in last step
`TYPE`    : `LINKS`
You will get response in json , for e.g.
[
   {
      "ID":"1",
      "SHORT_URL":"pDWOBz",
      "LONG_URL":"https://www.google.com",
      "COUNT":"0"
   },
   {
      "ID":"2",
      "SHORT_URL":"CIKH-f",
      "LONG_URL":"https://microsoft.com",
      "COUNT":"0"
   },
   {
      "ID":"3",
      "SHORT_URL":"FnMDHT",
      "LONG_URL":"https://kaustubhk24.netlify.app",
      "COUNT":"0"
   },
   {
      "ID":"4",
      "SHORT_URL":"an2pr6",
      "LONG_URL":"https://justinclicks.com",
      "COUNT":"0"
   },
   {
      "ID":"5",
      "SHORT_URL":"Esh4Cg",
      "LONG_URL":"https://example.com/affiliate",
      "COUNT":"0"
   }
]
Getting Specific Link Details
To get specific link with details use
// base url
your_domain.com/api.php

Request type : `GET`

// following parameters are required

`API_KEY` : Enter key you generated in last step
`TYPE`    : `VIEW`
`LINK_ID` : int LINK_ID e.g. 1
You will get response in json , for e.g.
[
   {
      "ID":"6",
      "SHORT_URL":"UMYi2",
      "LONG_URL":"https://facebook.com",
      "COUNT":"0"
   }
]
Adding New Link
To add new link we have 2 ways
Link with ShortLink
If you want specific short link for given long_url, please pass params as follow
// base url
your_domain.com/api.php

Request type : `GET`

// following parameters are required

`API_KEY` : Enter key you generated in last step
`TYPE`    : `ADD`
`SHORT_URL` : short_url you want to set, do not use domain, use only code e.f. xyz
`LONG_URL` : LONG_URL is url where you want to redirect your short url
Link without ShortLink
If you want to generate short code automatically
// base url
your_domain.com/api.php

Request type : `GET`

// following parameters are required

`API_KEY` : Enter key you generated in last step
`TYPE`    : `ADD`
`LONG_URL` : LONG_URL is url where you want to redirect your short url
You will get following response in both cases,
URL added[
   {
      "ID":"6",
      "SHORT_URL":"UMYi2",
      "LONG_URL":"https://facebook.com",
      "COUNT":"0"
   }
]
Deleting Link
To delete link
// base url
your_domain.com/api.php

Request type : `GET`

// following parameters are required

`API_KEY` : Enter key you generated in last step
`TYPE`    : `DELETE`
`LINK_ID` : int LINK_ID e.g. 1
You will get following response
Deleted
Managing Users
Getting All Users
To get all users with details use
// base url
your_domain.com/api.php

Request type : `GET`

// following parameters are required

`API_KEY` : Enter key you generated in last step
`TYPE`    : `USERS`
You will get response in json , for e.g.
[
   {
      "USER_ID":"1",
      "USERNAME":"kaustubh",
      "EMAIL":"info@example.com"
   },
   {
      "USER_ID":"2",
      "USERNAME":"kk",
      "EMAIL":"info@example.com"
   }
]
Getting Specific Users Details
To get specific user with details use
// base url
your_domain.com/api.php

Request type : `GET`

// following parameters are required

`API_KEY` : Enter key you generated in last step
`TYPE`    : `VIEW`
`USER_ID` : int USER_ID e.g. 1
You will get response in json , for e.g.
[
   {
      "USER_ID":"1",
      "USERNAME":"kaustubh",
      "EMAIL":"info@example.com"
   }
]
Adding User
To add user
// base url
your_domain.com/api.php

Request type : `GET`

// following parameters are required

`API_KEY` : Enter key you generated in last step
`TYPE`    : `ADD`
`EMAIL` : users email
`USERNAME` : username for login
`PASSWORD` : send non-encrypted password, it will be automatically encrypted.
You will get following response
User added[
   {
      "USER_ID":"14",
      "USERNAME":"test",
      "EMAIL":"in@demo.com"
   }
]
Deleting User
To delete user
// base url
your_domain.com/api.php

Request type : `GET`

// following parameters are required

`API_KEY` : Enter key you generated in last step
`TYPE`    : `DELETE`
`USER_ID` : int USER_ID e.g. 1
You will get following response
Deleted
Common Errors
You may face following issues while using api, so it is recommended to handle all of these exceptions.
- Invalid Operation : You have to pass correct operation in
TYPEparameter, else API request will be rejected with above error. - Invalid API Key : Please check if you are passing active API key to
API_KEYwith no spaces in both sides. - Database Not Reachable : Check if your database is not overloaded.
Contribute
You can contribute in 3 ways
Core files
While making changes in core files please add comments in code, make sure your code does not break any previously written code.
Translations
To contribute language, please visit assets/local
Editing Current Translations
Visit any language file you want, please note we're using iso language code for file name, for example, file name for Hindi language will be hi.php, After making changes please create pull request.
Adding New Language
To add new language please find correct ISO code of language you are adding and create file with ISO_LANGUAGE_CODE.php, for example name for Hindi language file will be hi.php, Now copy the text from sample.php and paste it in file you just created and replace array values as required.
"Language"=>"Language Name you want to show",
..
...
// Now complete all remaining fields
After that open index.php and add new array key and value for language
$languages = array(
    "English"=>"en",
    "मराठी"=>"mr",
    "हिंदी"=>"hi"
);
Please make sure array key must be Name of language and array value must be iso code of language.
After committing changes please make pull request.
Sponsor
To Sponsor project please visit https://github.com/kaustubhk24/EasyURLs and Click on Sponsor button.