How to Install LAMP Stack on DigitalOcean Ubuntu 20.04?
Before starting this process please create your Digital Ocean Account here.
Or visit Digital Ocean Directly here With $100 FREE Credits.
Now Visit Digital Ocean & Click on Sign In. You will be redirected to https://cloud.digitalocean.com/
Creating Droplet
In Digital Ocean we call a server as Droplet.
Now click on Create Button Top right corner and Select Droplet Option.

Now once we click on Create Droplets , next we have to select Droplet Configuration.
For This tutorial We are going to use below configuration. If you are going to follow this tutorial. Kindly use below configuration.
Distributions : Ubuntu 20.04
Choose Plan : $5/month
Authentication : Password
Password : Create a secure Password(Keep safe)
Hostname : Set a Name you can use to identify the droplet
Now click on that Create Droplet button.
Done. Now our droplet is queue. Digital Ocean will create a droplet for us, & we will Get Public IPV4 address for that droplet.
Once a droplet created You'll see its IP address, copy that IP Address.
If you are using any Linux or Mac version in your PC.
Login our Droplet using below command in terminal.
$ ssh root@ip_address_of_droplet
If you are using Windows you will use Putty.
Or simply use the Console Provided by Digital Ocean.

Now click on that Console button right corner. It will open a Prompt with terminal. If your internet speed is slow. You will see your commands slow.

Now you will see below screen.
yoursitename login : root
Enter password . which we created while creating droplet.
This are some commands you have to run .
$ apt update
$ apt upgrade
$ apt autoremove
Press Y if prompts any where.
Installing Apache
To install apache we will run a very simple command
$ apt install apache2
Click Y if prompted.
Now our Apache is installed. If you visit your_ip_address you will see the apache2 default page. if you don't see the page, No problem. We need to configure our firewall.
Installing MySQL
Let's install MySQL. Paste below commands in your terminal.
$ apt install mysql
Now we have completed installing MySQL.
Next step we will install PhpMyAdmin
Installing PhpMyAdmin
Like other software we installed. php My admin is also has similar and tricky installation
$ apt install phpmyadmin
Now you have to complete remaining setup by reading options correctly.

in this configuration window, You have to select apache2.
to select click on space bar. You will see [ * ] this mean the option is selected.

In this you have to select Yes option.
That will create a database for you to configure users.
In next step you have to setup password for PhpMyAdmin

also, add a confirm password. That's it. PhpMyadmin installation is done. Now the last and important part of the setup is firewall configuration.
Firewall Configuration
To configure firewall we will paste below commands. In Ubuntu we have ufw.
$ ufw status
If you see output. you have firewall installed. basically os comes with firewall. In case not installed paste below command.
$ apt install ufw
After that run status command again, now we will add apache in allowed apps & OpenSSH also.
$ ufw allow "Apache Full"
$ ufw allow OpenSSH
$ ufw enable
$ sudo service apache2 restart
Now , Our Droplet needs to restart.
$ reboot
Now login to system again. Once you login.use below command to start apache server
$ sudo service apache2 restart
Now we have completed installation of LAMP stack on Ubuntu 20.04.
We will check installation now.
Open Any browser type droplet's your public ip_address.
If you see below page your installation is successful.

Above is default page of apache server to tell that configuration is successful.
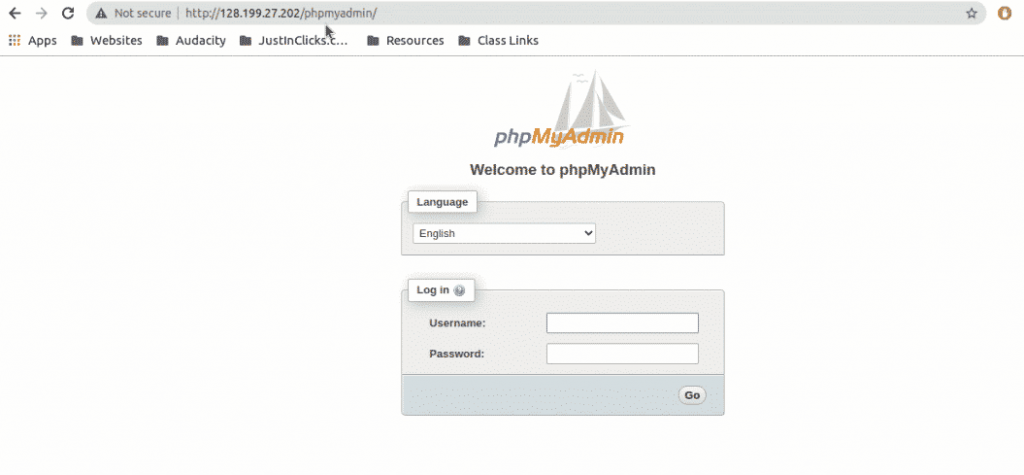
Now check the installation of PhpMyAdmin. Visit
your_ip_address/phpmyadmin
If you see below screen

Done . we have completed LAMP installation on Digital Ocean Ubuntu 20.04 .
Special Offer for My Readers
Below is the special Link. Which is Gift from us for you. You just have to click on below link & Create Your FREE Digital Ocean Account & Get FREE $100 Credit. That means you'll get your first cloud completely FREE.